HarmonyOS NEXT Deployment
Integration and Deployment Instructions for the Harmony Platform of the TuneCloud User Experience Monitoring SDK
Environmental requirements
Minimum support: API 12 Release
Installing the SDK
Remote installation
Enter the project root directory and execute the following commands
ohpm install @tingyun/sdk-core
If you need to install a specific version of the SDK, you can manually specify the version (<version> is the specific version number)
ohpm install @tingyun/sdk-core@<version>
Installation of intranet repository
Users in the intranet environment are advised to upload the relevant har package to the enterprise intranet repository and complete the installation process through the intranet repository
Download the latest SDK from the Tingyun console Management - Download Center - App - Harmony, unzip the downloaded zip file, and upload the tingyun-core_version.har to the enterprise intranet repository
Enter the project root directory and execute the following commands
ohpm install @tingyun/sdk-core
If you need to install a specific version of the plugin, you can manually specify the version (<version> is the specific version number)
ohpm install @tingyun/sdk-core@<version>
Confirm project compatibility with bytecode format HAR package
The SDK HAR package is in bytecode format, and it is necessary to set useNormalizedOHMUrl to true in the project-level build-profile.json5
{
  "app": {
    "products": [
      {
         "buildOption": {
           "strictMode": {
             "useNormalizedOHMUrl": true
           }
         }
      }
    ]
  }
}
Permission configuration
| Permission Name | Purpose | Required |
|---|---|---|
| ohos.permission.INTERNET | SDK sends data. It cannot be initiated without configuring the SDK | Yes |
| ohos.permission.GET_NETWORK_INFO | Gets network connection information. After configuration, it can obtain information about network type and connection method | No |
| ohos.permission.STORE_PERSISTENT_DATA | Stores device ID. After configuration, the SDK can obtain the device ID more accurately | No |
Initialize SDK
Initialize the SDK in the onCreate method of the entry type module AbilityStage
import tingyun from '@tingyun/sdk-core'

export default class MyAbilityStage extends AbilityStage {
  onCreate(): void {
    tingyun.init({
      // Redirect server address, obtain it from the console settings page
      redirectHost: '<Redirect server address>',
      // appKey, obtain it from the console settings page
      appKey: '<AppKey>',
      // Context
      context: this.context
    })
  }
}
Note:
Starting from version 1.7.0, the return type of tingyun.init has been changed from Promise<void> to void to prevent blocking the application startup process due to misuse of await. If there are await calls in legacy code, the IDE will prompt as invalid, please remove them promptly
2. The internal startup process of the SDK is asynchronous, and some APIs require waiting until the SDK has fully started before they can be invoked. If you need to execute logic after the SDK has been started, please refer to the SDK Startup Status Management section
Optional Settings
Configure the first-time startup module switch
By default, the SDK only enables crash data collection upon its first launch, and other functional modules are enabled after interacting with the server.
If you wish to enable other functional modules upon initial startup, you can manually configure the activation status of the corresponding modules in tingyun.init.
Example:
import tingyun from '@tingyun/sdk-core'

tingyun.init({
  // Other configurations
  network: {
    // Open network request collection
    enabled: true
  },
  ue: {
    // Open user experience data collection, including startup, page, and operation collection
    enabled: true
  },
  webview: {
    // Open webview data collection
    enabled: true
  }
})
For more configuration options, please refer to the "SDK Configuration Options" section in the API documentation
Network request collection
The SDK supports multiple methods for collecting network request data, among which Axios and RCP require corresponding configurations.
Axios
The SDK supports the @ohos/axios library, which mainly includes two configuration methods:
- Pass in the axios instance during
tingyun.init:import tingyun from '@tingyun/sdk-core'
import axios from '@ohos/axios'
tingyun.init({
// Other configurations
// Pass in the axios instance object
axios: axios
}) - Use
tingyun.registerAxiosInstanceto register an axios instance (multiple instances can be registered by calling it multiple times):import tingyun from '@tingyun/sdk-core'
import { axiosInstance } from './your-axios-config'
// Regular registration (waiting for network switch initialization to complete)
tingyun.registerAxiosInstance(axiosInstance)
// Register immediately (without waiting for the network switch initialization to complete)
// Usage scenario: This option can be used when users need to control the timing of interceptor injection, and wish to inject the Tingyun interceptor in advance to ensure the execution order of interceptors
tingyun.registerAxiosInstance(axiosInstance, { immediate: true })
RCP
RCP data collection requires the inclusion of an interceptor provided by the SDK when calling createSession:
import tingyun from '@tingyun/sdk-core'

const session = rcp.createSession({
  // Other configurations
  // Add interceptor
  interceptors: [new tingyun.RCPInterceptor()]
})
First launch of collection configuration
To collect network request data during the first startup, you need to enable network request collection in tingyun.init:
import tingyun from '@tingyun/sdk-core'

tingyun.init({
  // Other configurations
  network: {
    enabled: true
  }
})
User experience monitoring
User experience monitoring encompasses startup monitoring, page monitoring, and operation monitoring.
Start monitoring configuration
To collect initial startup data, you need to enable user experience monitoring in tingyun.init:
import tingyun from '@tingyun/sdk-core'

tingyun.init({
  // Other configurations
  ue: {
    enabled: true
  }
})
Page and operation monitoring configuration
Page and operation monitoring now support automatic data collection, eliminating the need to manually call APIs.
Set User ID
import tingyun from '@tingyun/sdk-core'

// Set the user ID (<userId> is the specific user ID)
tingyun.setUserId('<userId>')
Webview data collection
Webview data collection primarily involves two operations:
- Register the webview controller using
tingyun.registerWebviewController - Use
tingyun.getWebScriptItemto obtain the monitoring script and inject it into the webview
Example:
import tingyun from '@tingyun/sdk-core'

Web({ src: '<URL>', controller: this.controller })
  // Ensure that both javaScriptAccess and domStorageAccess are in the enabled state
  .javaScriptAccess(true)
  .domStorageAccess(true)
  .onControllerAttached(() => {
    // Register the webview controller in the onControllerAttached callback
    tingyun.registerWebviewController(this.controller)
  })
  // Inject the JS code required for monitoring
  .javaScriptOnDocumentStart([tingyun.getWebScriptItem()])
Enable national cryptography encryption
The SDK supports sending data using the national cryptography encryption method, which can be enabled by setting encEnabled: true during tingyun.init. The platform server also needs to enable the national cryptography encryption function synchronously.
import tingyun from '@tingyun/sdk-core'

tingyun.init({
  // Other configurations
  // Enable national cryptography encryption
  encEnabled: true
})
Privacy Configuration
The SDK supports fine-grained control over public information collection to meet the privacy compliance requirements of different applications. Through the common configuration item, the collection of the following device information can be controlled:
- Operating system version (
osVersionEnabled) - Device manufacturer (
manufacturerEnabled) - Device model (
manufacturerModelEnabled) - Carrier information (
carrierEnabled) - Screen resolution (
displayResolutionEnabled)
By default, all information collection is enabled. To disable the collection of specific information, you can configure it during initialization:
tingyun.init({
  // ...Other configurations
  common: {
    osVersionEnabled: false,          // Do not collect operating system version
    manufacturerEnabled: false,      // Do not collect device manufacturer information
    manufacturerModelEnabled: false, // Do not collect device model
    carrierEnabled: false,            // Do not collect carrier information
    displayResolutionEnabled: false // Do not collect screen resolution
  }
})
Note: Disabling certain information collection may affect the integrity of some monitoring functions.
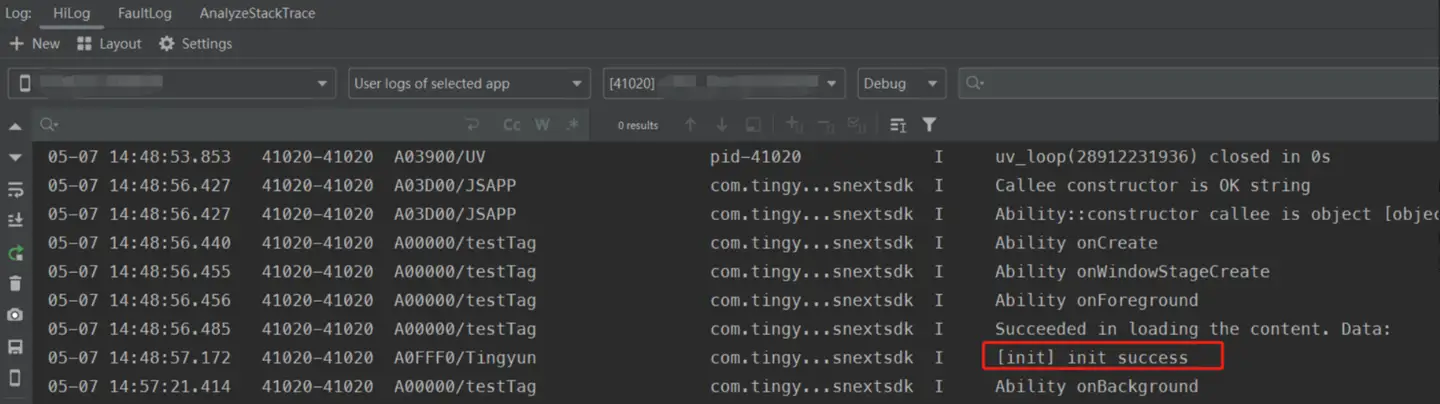
Embedded code verification
After embedding the code, launch the app, open the Log -> HiLog menu in the IDE, select the corresponding app, view the logs, and search for logs with the tag Tingyun. If there are logs containing the keyword init success, it indicates that the embedding is successful