Symbol File Management
Android Symbolization
Use and upload of Java symbol file tool
The Tingyun SDK provides two ways to upload mapping files.
- Upload via report
- Automatic upload of files through tingyun.properties
Upload Mapping file through report
-
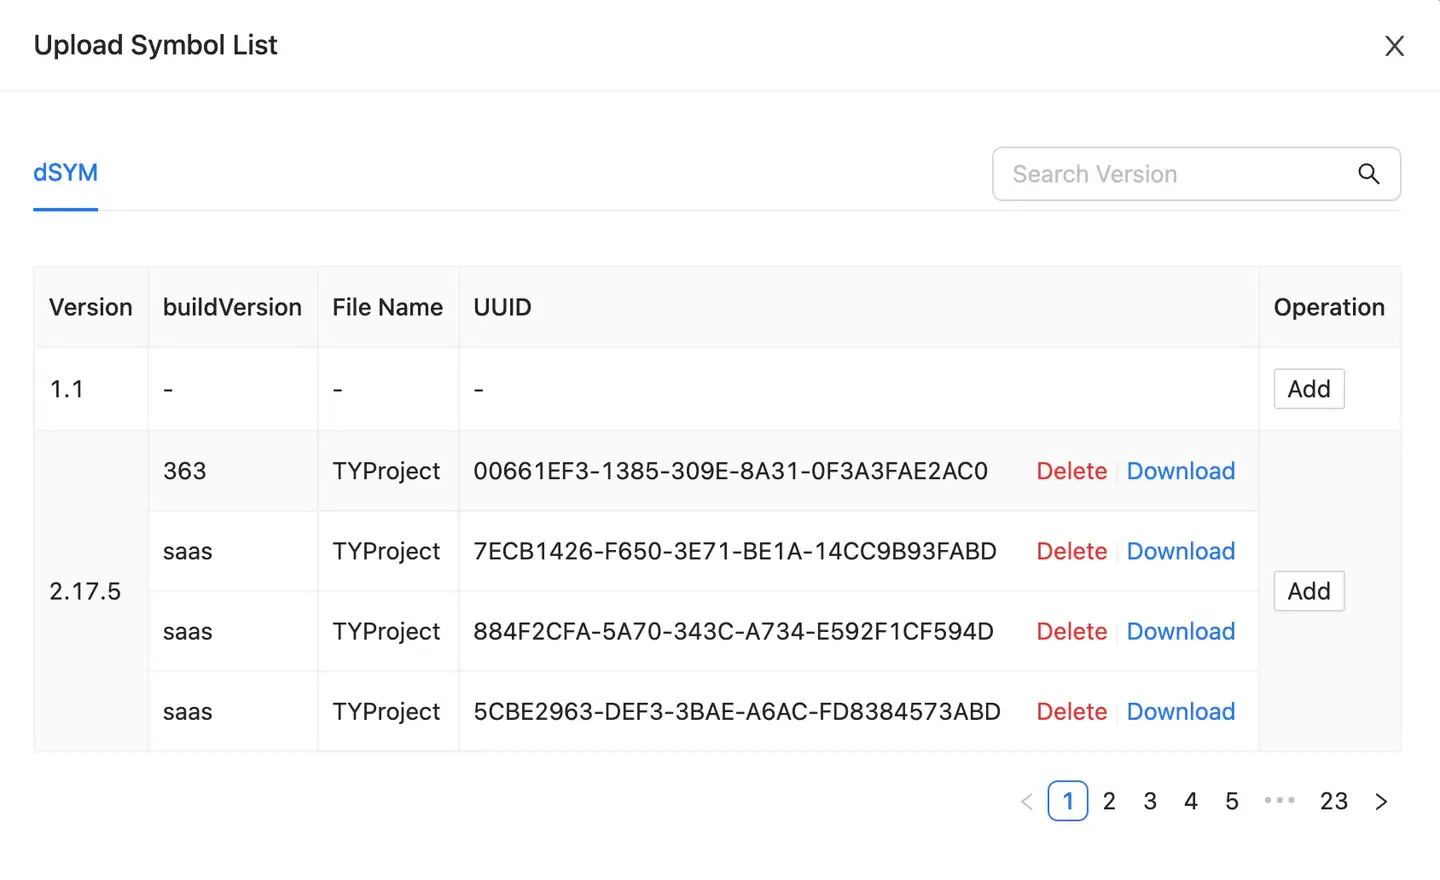
Log in to Tingyun Report, select the Exception analysis module, click the Breakdown card, and click Manage Symbol List in the upper right corner of the "Crash List".

-
Find the corresponding version and upload the local Mapping file.
By default, the symbol file upload is sorted according to the data receiving time of the application version, and supports retrieval according to the application version. One version supports uploading multiple files.
Automatic upload of files through tingyun.properties
Automatically upload the Mapping file through the Tingyun. Properties file. The SDK needs to be version 2.15.7 or above.
Explain: If the "tingyun.properties " file does not exist in your project, you need to create the file in the project app directory and the root directory.
-
Configured in the tingyun.properties file.
uploadAddress=*The main domain for accessing the Tingyun login dashboard(For example:https://wukong2.tingyun.com)*
appKey=*Tingyun AppKey*
mapping_file_auto_upload=true -
Turn on the obfuscator.
The mapping_file_auto_upload control switch takes effect only when the obfuscator is enabled. After the control switch is enabled, the mapping file in the local directory will be automatically uploaded to the Tingyun server by the Tingyun SDK. If the obfuscator is not enabled, the configuration item does not take effect.
Use and upload of Native symbol file tool
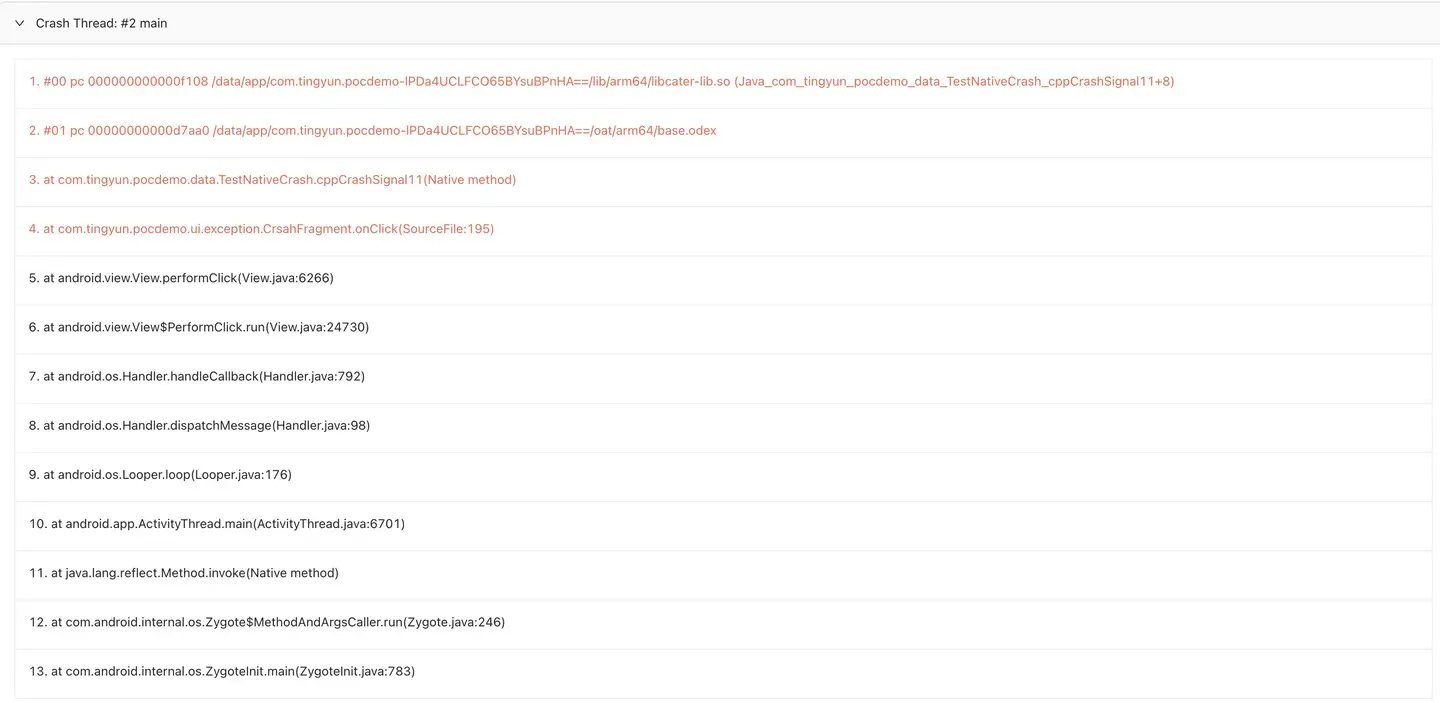
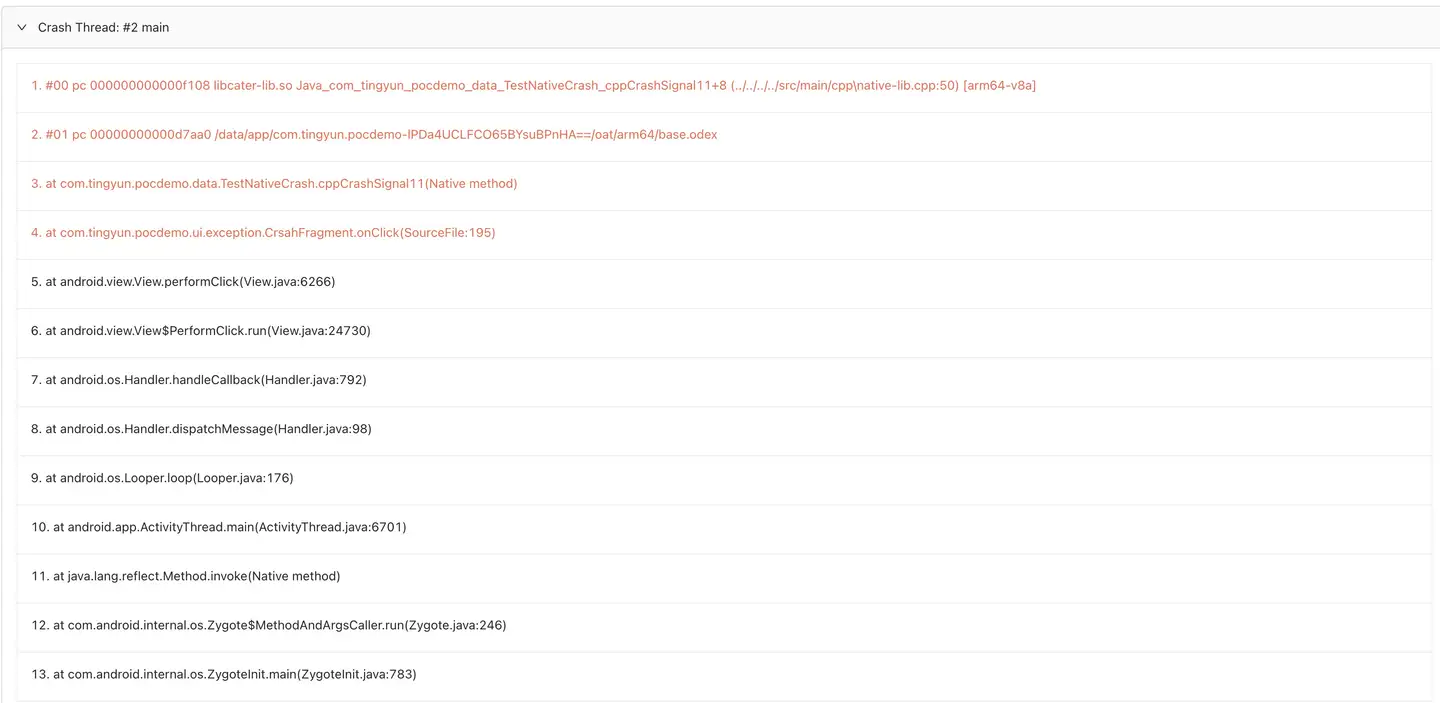
In order to quickly and accurately locate the code location where Native Crash occurs in the application, the Tingyun uses the symbol file file to parse and restore the application crash stack.
Original stack:
Post-restore stack:
symbol file extraction requirements
The symbol file tool nbs.newlens.so.parse.Jar is a tool provided by Tingyun App for developers to extract symbol file files. Extracting the symbol file requires the symbol file tool and the Debug SO file (an SO file with debug information). By default, the SDK will automatically generate a symbol file file in the Tingyun folder of the project root directory when compiling the release version. You can also generate the symbol file file manually using the symbol file tool.
Tool options
| Options | Explain |
|---|---|
| -i | Specify the so folder path |
Generate a symbol file file
The command to generate a symbol file file using the symbol file tool's JAR package is as follows:
java -jar nbs.newlens.so.parser.jar -i E:\JNIDemo\jniLibs //Specified directory
The generated symbol file file NewlensSymbol. Zip is located in the symbol file tools directory.
Notice: Only zip format
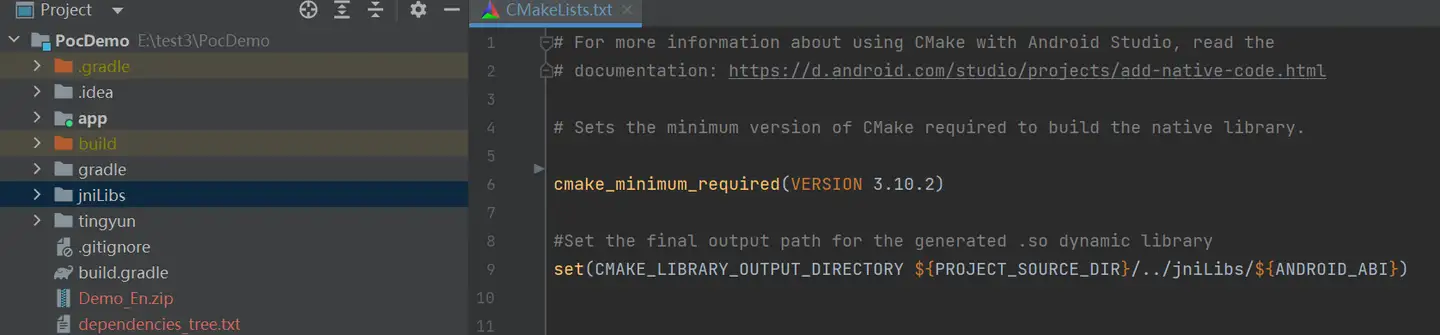
-iis supported for the symbol file file uploaded by the Tingyun. For the parameter, please specify the path of the generated SO folder. The default path is generally app \ build \ intermediates \ cmake \ debug \ obj, and it can also be output to other directories through the CMakeLists. Txt file configuration.
Upload the symbol file
Native symbol file files currently only support report uploading.
-
Log in toTingyun Report, select the Exception Analysis module, click the Breakdown card, and click Manage Symbol List in the upper right corner of the "Crash List".
-
Select Native symbol a tab and click Select a file Upload NewlensSymbol. Zip.

IOS Symbolization
Find the symbol file
-
Find the.xcarchive file of the project, and then right select "Show in Finder" to enter the file directory.

-
Right-click the.xcarchive file and select Show Package Contents.

-
Select the corresponding ".App.DSYM" file, such as "HelloWorld.App.DSYM", and right-click "Show Package Contents".
Notice: The marked part in the figure below is the symbol file file. Please upload this file instead of XXX.App.DSYM this directory.

Upload symbol file file via script
Upload the symbol file file through the Xcode + sh script. The operation steps are as follows.
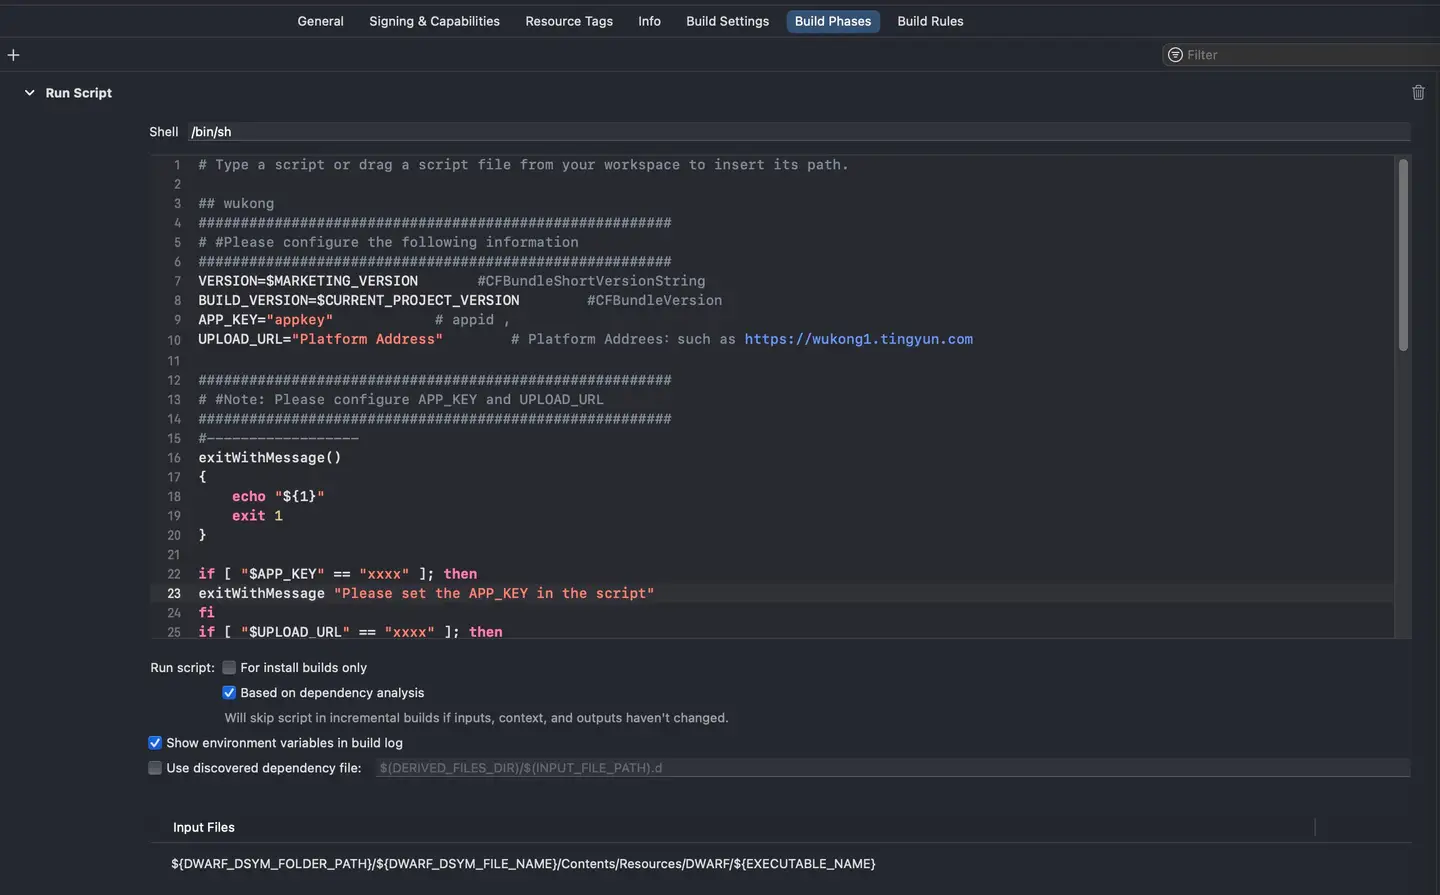
-
Paste the contents of the tingyun.sh in the unzipped SDK package into the location below the shell in the figure above.
-
Configure the corresponding APP_KEY and UPLOAD_URL in the above figure.
-
Add in Input Files:
-
To call the following interface, change the value of VERSION in the script to be consistent with the versionName set by the interface.
(void)setVersionName:(NSString *)versionName; -
If the following interface is called and useBuildVersion is YES, change the value of VERSION in the script to be consistent with the version number of CFBundleVersion (xcode-> General-> Identity-> Build).
+(void)startWithAppID:(NSString*)appId location:(BOOL)locationAllowed rateOfLaunch:(double) rate channelId:(NSString *)channelId useBuildVersion:(BOOL)useBuildVersion;
-
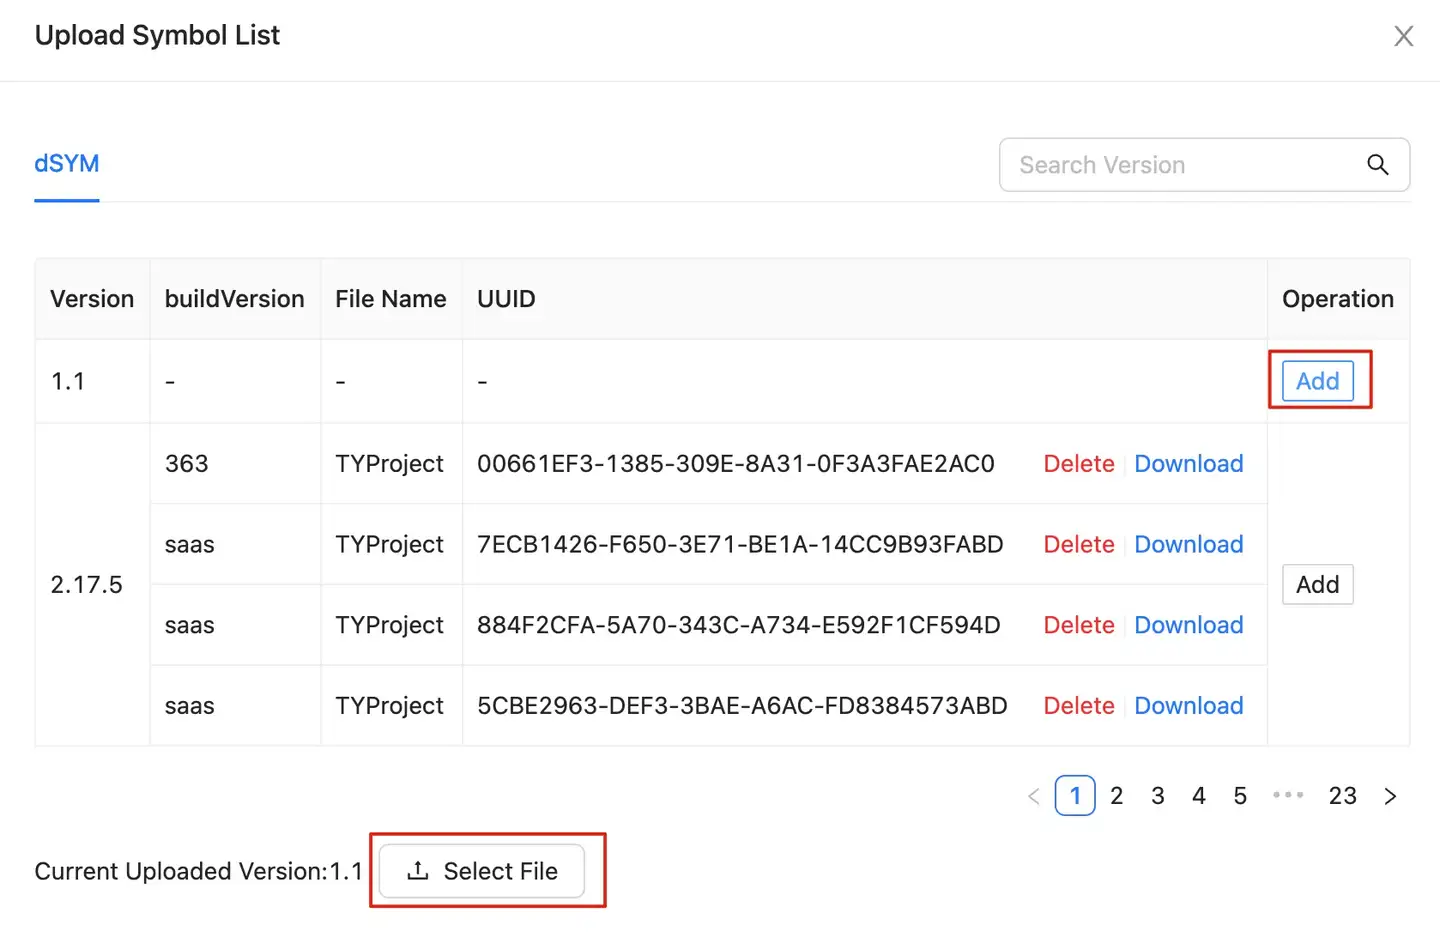
Upload symbol file file through report
-
Log in toTingyun Report, select the Exception Analysis module, click the Breakdown card, and click Manage Symbol List in the upper right corner of the "Crash List" below.
-
Click Add to the button on the right side of the corresponding application version number in the pop-up window, and then click the Select a file button at the bottom to manually upload the symbol file. As shown in the following figure:
Uploading a symbol file from the command line
-
Open the terminal, enter HelloWorld the directory of the symbol file, that is, the HelloWorld.App.DSYM/Contents/Resources/DWARF, and enter the following command:
curl -k -F file=@HelloWord -F buildVersion=CFBundleVersion -F shortVersion=CFBundleShortVersionString UPLOAD_URL/app-api/symbol/appkey/APP_KEY -
Command line parameter configuration:
HelloWorld : Symbol file name
CFBundleShortVersionString : Major version number(xcode->General->Identity->Version)
CFBundleVersion : build version number(xcode->General->Identity->Build)
UPLOAD_URL : The main domain for accessing the Tingyun login dashboard (For example:https://wukong2.tingyun.com)
APP_KEY: The authorization key for accessing the Tingyun App is typically referred to as the "API Key". -
Upload symbol file: After the configuration is completed, the symbol file can be uploaded to the Tingyun server through the command line. When SUCCESS appears, it indicates that the upload is successful.
{
   "status": "SUCCESS",
   "message": "result: file name: HelloWord;builds : 44818402-CFA4-39E4-90B7-953914DE8A23,60ABFC59-0513-314D-8E66-BD81EC0FF1D2;SHA-1 : "
} -
The execution command and results are shown in the figure below:

HarmonyOS NEXT Symbolization
TINGYUN CLI Symbol Table File Upload Tool
Tingyun CLI is a CLI tool used to upload HarmonyOS NEXT symbol table files, supporting Windows, Mac, and Linux operating systems.
Installation
Method 1: npm
Local installation
- Enter the project directory
npm install @tingyun-common/cli
- Verify that the installation is successful
npx tingyun-cli -v
If the tingyun-cli version is printed in the terminal, it proves that the installation is successful
Global installation
- Installation
npm install -g @tingyun-common/cli --unsafe-perm
Make sure you have permission to access the global node_modules directory. If you encounter permission issues in Linux or Mac environments, it is recommended to use root installation
sudo npm install -g @tingyun-common/cli --unsafe-perm
- Verify that the installation is successful
tingyun-cli -v
If the tingyun-cli version is printed in the terminal, it proves that the installation is successful
Configure the executable file download address (optional)
During the CLI installation process, the executable file will be downloaded from the server. The root path of the download address can be set by the --tingyuncli_cdnurl parameter. If not configured, the default address of the Tingyun file download server is used
Example:
npm install @tingyun-common/cli --tingyuncli_cdnurl=http://example.com/path
Method 2: Manually download the executable file
You can view the released versions of Tingyun CLI on the Tingyun File Download Server and download the required executable file according to the operating system and architecture. Please select the latest version of Tingyun CLI to support uploading the HarmonyOS NEXT symbol table. After downloading, you can rename the executable file to tingyun-cli.exe or tingyun-cli for use. Note that the executable file is a CLI program and needs to be used in a terminal.
Use
HarmonyOS NEXT
1. Upload symbol table file
Command:
- Specify the HarmonyOS NEXT project root directory scenario
tingyun-cli upload <project root directory> --beacon=<beacon> --app-token=<app token> --token=<token> --app-version=<app version> --build-id=<buildId> --platform=HarmonyOSNEXT
- Specify the common directory scenario
tingyun-cli upload <common directory> --beacon=<beacon> --app-token=<app token> --token=<token> --app-version=<app version> --build-id=<buildId> --platform=HarmonyOSNEXT --module=<module name> --package=<package name>
Description:
- The CLI automatically determines whether the specified directory is the root directory of a HarmonyOS NEXT project. If it is, it runs in
project root directory mode, otherwise it runs innormal mode - In project root directory mode, the CLI will read the
app.json5file, try to read the application version fromapp.versionName, and try to read thetingyun_build_idenvironment variable fromapp.appEnvironments. If it cannot be read, it needs to be manually specified, and the files of each module under the current project will be automatically collected. In normal mode, you must manually specify the application version, buildId, module, and package. - appToken, token, and application version can be set through configuration files or passed directly through commands.
- For more configuration parameters, refer to the command list below.
2. Set the application version of the project.
For accurate parsing, you need to ensure that the application version and buildId of the project itself are consistent with those passed by the CLI. The application version is set in app.versionName in app.json5. The buildId can be set in the following two ways.
Method 1: Set in app.appEnvironments
{
  "app": {
    "appEnvironments": [
      {
        "name": "tingyun_build_id",
        "value": "<buildId>"
      }
    ]
  }
}
Method 2: Set when SDK starts
tingyun.init({
  // ...
  buildId: '<buildId>',
});
Command list
init
Initialize the configuration file
tingyun-cli init
Flags:
-y: Skip the questionnaire and generate the configuration file directly
upload
Upload files (currently only supports HarmonyOSNEXT)
tingyun-cli upload <dir> [flags]
Note: Currently only the HarmonyOS NEXT symbol table upload supports this command
Flags:
-
--beacon <string>: Upload beacon address, the main domain name of the Tingyun Report (for example:https://wukong1.tingyun.com) -
--app-token <string>: Application token (appKey), obtained in Tingyun ReportUser experience->Mobile App->Application List->Application Settings->Basic Settings->App Key -
--token <string>: account token, obtain it in Tingyun ReportAccount Management->API->Access Token -
--app-version <string>: application version -
--build-id <string>: build ID -
--platform <string>: currently only supportsHarmonyOSNEXT -
--sourcemap: upload only sourcemap files -
--namecache: upload only namecache files -
--symbol: upload only so file symbol table files -
--product <string>: specify the product name to be uploaded, the default isdefault -
--target <string>: specify the target name to be uploaded, the default isdefault -
--module: specify the module name of the module to be uploaded (module.name field in module.json5), multiple use,to separate -
--package <string>: Specify the package name of the module to be uploaded (name field in oh-package.json5), use,to separate multiple names -
--output <string>: package file generation directory, default isTingyunSymboldirectory under the current directory -
--remove-output: delete package file after uploading, default is not deleted -
--no-upload: only package upload file, no report -
--upload-retries <int>: number of retries after sending failure. Default is 0, no retry after failure
Others
View version
tingyun-cli -v
Specify configuration file path
Flags:
--config <string>: Specify configuration file location, global flags, effective for all command subcommands.
Example:
tingyun-cli upload <project root directory> --beacon=<beacon> --app-token=<app token> --token=<token> --app-version=<app version> --build-id=<buildId> --platform=HarmonyOSNEXT --config /my/config/dir/.tingyunclirc.toml
hvigor plugin
This plugin is used to automatically collect and report symbol table related files when compiling the HarmonyOS NEXT project.
Usage examples
Installation
- Introduce hvigor plugin dependency
Add plugin dependency in the project root directory hvigor/hvigor-config.json5
{
  // ...
  "dependencies": {
    "@tingyun-common/hvigor-plugin-build": "<version number>"
  }
}
- Register the plugin in the project-level hvigorfile.ts
import { appTasks } from '@ohos/hvigor-ohos-plugin';
import { tingyunBuildPlugin } from '@tingyun-common/hvigor-plugin-build'

export default {
  system: appTasks,
  plugins:[
    tingyunBuildPlugin({
      beacon: "<beacon>",
      token: "<token>",
      appToken: "<app token>"
    }),
    // ... other plugins
  ]
}
- Sync project
hvigorw --sync -p product=default -p buildMode=release --analyze=normal --parallel --incremental --no-daemon
Note:
- If tingyun-cli customizes the download address, you need to ensure that the environment variable of the relevant download address exists before executing
- Build the project, observe the log output, and you can see that the files are packaged and reported
Uninstall
-
Unregister the plugin in the project-level hvigorfile.ts
-
Comment or remove the plugin dependency in the project root directory
hvigor/hvigor-config.json5 -
Sync project
Plugin configuration items
type TingyunBuildPluginOptions = {
// The directory to be reported. If the user does not set it, the plugin will automatically pass the project root directory
include?: string[];
// Upload address, directly configure beacon or configure it in the configuration file specified by configFile
beacon?: string;
// auth token, directly configure beacon or configure it in the configuration file specified by configFile
token?: string;
// Application token, directly configure beacon or configure it in the configuration file specified by configFile
appToken?: string;
// Configuration file path, when beacon, token, appToken are not specified, it will try to read from the configuration file
configFile?: string;
// BuildMode of the plugin to be executed, the default is release
buildMode?: string;
// Application version
appVersion?: string;
// Build ID
buildId?: string;
// Specify the product name to be uploaded, which will be automatically obtained by default during the build
product?: string;
// Specify the target name to be uploaded
target?: string;
// Module name to be reported, all modules under the project are reported by default
modules?: string[];
// Package name to be reported (name in oh-package.json5), all packages under the project are reported by default
packages?: string[];
// Only sourceMap reporting switch is collected, default false
sourceMap?: boolean;
// Only nameCache reporting switch is collected, default false
nameCache?: boolean;
// Only symbol reporting switch is collected, default false
symbol?: boolean;
// Output directory
output?: string;
// Remove the packaged zip file after uploading, default false
removeOutput?: boolean;
// Only package and do not report, default false
noUpload?: boolean;
// Length of each batch of demangle parameters, default 4096
demangleBatchSize?: number;
// Number of retries, default 0
uploadRetries?: number;
};