Android Gradle Deployment
Adding Plugins
- Kotlin
- Groovy
- Add the following content in the build.gradle.kts file at the project level.
buildscript {
    extra["tingyun_sdk_version"] = "2.18.0"
    extra["tingyun_ndk_version"] = "2.0.10"
    repositories {
        maven {
            setUrl("https://nexus2.tingyun.com/nexus/content/repositories/snapshots/")// Add the Tingyun repository
        }
    }
    dependencies {
        classpath("com.networkbench:tingyun-ea-agent-android-gradle-plugin:${rootProject.extra["tingyun_sdk_version"] as String}")
    }
}
- In the settings.gradle.kts file, configure the TingYun repository.
pluginManagement {
    repositories {
        maven {
            setUrl("https://nexus2.tingyun.com/nexus/content/repositories/snapshots/")// Add the Tingyun repository
        }
    }
}
dependencyResolutionManagement {
    repositoriesMode.set(RepositoriesMode.FAIL_ON_PROJECT_REPOS)
    repositories {
        maven {
            setUrl("https://nexus2.tingyun.com/nexus/content/repositories/snapshots/")// Add the Tingyun repository
        }
    }
}
- Add the following content in the build.gradle.kts file at the App level.
id("newlens")// Place it under the id("com.android.application")

dependencies {
    implementation("com.networkbench:tingyun-ea-agent-android:${rootProject.extra["tingyun_sdk_version"] as String}")
    implementation("com.networkbench.newlens.agent.android2:nbs.newlens.nativecrash:${rootProject.extra["tingyun_ndk_version"] as String}")// This package needs to be integrated to collect native crash
    implementation("com.networkbench:nbs.newlens.android.log:1.0.4")// This package needs to be integrated for log recovery
    // Collecting OOM data requires kotlin-gradle-plugin plugin 1.3+, and depends on androidx.core:core-ktx, androidx.appcompat:appcompat, androidx.lifecycle:lifecycle-process, com.squareup.okio:okio and other libraries
    implementation("com.networkbench:tingyun-javaleak:1.0.4")// This package needs to be integrated to collect OOM
    implementation("org.bouncycastle:bcprov-jdk15to18:1.78.1")// This package needs to be integrated to enable national encryption
    implementation("org.bouncycastle:bcpkix-jdk15to18:1.78.1")// This package needs to be integrated to enable national encryption
}
- Add the following content in the build.gradle file at the project level.
buildscript {
    ext.tingyun_sdk_version = '2.18.0'
    ext.tingyun_ndk_version = '2.0.10'
    repositories {
        maven { url "https://nexus2.tingyun.com/nexus/content/repositories/snapshots/" }// Add the Tingyun repository
    }
    dependencies {
        classpath "com.networkbench:tingyun-ea-agent-android-gradle-plugin:$tingyun_sdk_version"
    }
}

allprojects {
    repositories {
        maven { url "https://nexus2.tingyun.com/nexus/content/repositories/snapshots/" }// Add the Tingyun repository
    }
}
- Add the following content in the build.gradle file at the App level.
apply plugin:'newlens'// Place it under "apply plugin: 'com.android.application'"

dependencies {
    implementation "com.networkbench:tingyun-ea-agent-android:$tingyun_sdk_version"
    implementation "com.networkbench.newlens.agent.android2:nbs.newlens.nativecrash:$tingyun_ndk_version"// This package needs to be integrated to collect native crash
    implementation "com.networkbench:nbs.newlens.android.log:1.0.4" // This package needs to be integrated for log recovery
    // Collecting OOM data requires kotlin-gradle-plugin plugin 1.3+, and depends on androidx.core:core-ktx, androidx.appcompat:appcompat, androidx.lifecycle:lifecycle-process, com.squareup.okio:okio and other libraries
    implementation "com.networkbench:tingyun-javaleak:1.0.4" // This package needs to be integrated to collect OOM
    implementation "org.bouncycastle:bcprov-jdk15to18:1.78.1"// This package needs to be integrated to enable national encryption
    implementation "org.bouncycastle:bcpkix-jdk15to18:1.78.1"// This package needs to be integrated to enable national encryption
   }
Adding TingYun SDK
-
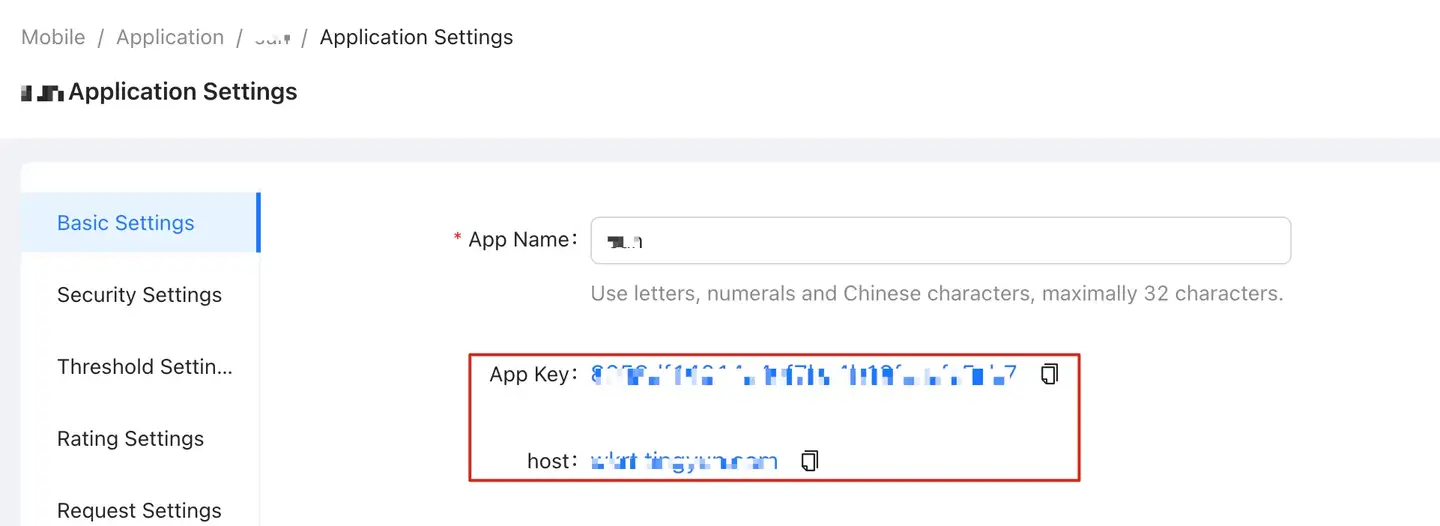
Obtain TingYun App Key.

-
Initialize the SDK.
i. Initialize the Android SDK in the onCreate() method of the Application.
// "Appkey" should be obtained from the Tingyun platform
// "Host" is the "Redirect" server address of the Tingyun platform, no need to add a protocol header
// setStartOption(7) sets the network, user experience, and crash collection to start on the first launch, effective only for the first launch
NBSAppAgent.setLicenseKey("AppKey").setRedirectHost("Host").setStartOption(7).start(this.getApplicationContext());
ii. The SDK defaults to uploading data via HTTPS. If the server only supports HTTP, you need to set 'setHttpEnabled(true)'.
NBSAppAgent.setLicenseKey("AppKey").setRedirectHost("Host").setHttpEnabled(true).setStartOption(7).start(this.getApplicationContext());
Permission Configuration Description
The Tingyun App SDK requires 'Internet permission' for interaction with the server.
<!-- Necessary permission for interaction with the server -->
<uses-permission android:name="android.permission.INTERNET"/>
<!-- Optional permission to obtain the current device's network status and WiFi status, such as: 2G, 3G, 4G, WiFi, recommended to add -->
<uses-permission android:name="android.permission.ACCESS_NETWORK_STATE"/>
<!-- Optional permission to obtain network status on devices with targetSdkVersion 29 or above, Android 10 or above -->
<uses-permission android:name="android.permission.READ_PHONE_STATE" />
<!-- Optional permission to use the 'Visual Operation Naming' feature -->
<uses-permission android:name="android.permission.SYSTEM_ALERT_WINDOW"/>
<uses-permission android:name="android.permission.SYSTEM_OVERLAY_WINDOW"/>
<!-- Optional permission to obtain the current mobile network connection's base station information -->
<uses-permission android:name="android.permission.ACCESS_COARSE_LOCATION"/>
Adding WebView Configuration
Note:Manual injection of the JS probe is required for versions below 2.18.0; please refer to the API Documentation.
To collect data from WebView and X5WebView, you need to call setDomStorageEnabled(true) and configure WebViewClient as well as WebChromeClient. If these methods are not invoked in your project, add the following code:
WebSettings webSettings = webview.getSettings();
webSettings.setDomStorageEnabled(true);
webview.setWebViewClient(new WebViewClient(){});
webview.setWebChromeClient(new WebChromeClient(){});
Obtain User Identifier
By adding a 'User Identifier', you can search for specific user performance issues on the Tingyun report platform using this identifier.
- Related Interface
// The userIdentifier can contain up to 256 characters, supports Chinese, English, numbers, underscores, but cannot contain spaces or other escape characters
NBSAppAgent.setUserIdentifier(String userIdentifier);
- Code Example
public class MainActivity extends Activity {
    public void onCreate(Bundle savedInstanceState) {
        super.onCreate(savedInstanceState);
        String userIdentifier = getUserID();
        NBSAppAgent.setLicenseKey("AppKey").start(this.getApplicationContext());
        //The user identifier can be an email address, phone number, or other information that can identify the user's identity, such as: xxx@tingyun.com
        NBSAppAgent.setUserIdentifier(userIdentifier);
    }
}
Enable National Secret Encryption
The SDK supports sending data using the national secret encryption method.
Note:
National secret encryption only supports Android 6.0 and above. After enabling national secret encryption, the SDK will not collect data on Android 5.x and below.
To enable national secret, you need to integrate bcpkix-jdk15to18-version.jar and bcprov-jdk15to18-version.jar.
The server side also needs to enable national secret encryption functionality simultaneously.
- Related Interface
//isEncryptionRequired defaults to false, set to true to enable national secret encryption
NBSAppAgent.encryptionRequired(boolean isEncryptionRequired)
- Code Example
NBSAppAgent.setLicenseKey("AppKey").setRedirectHost("Host")
.encryptionRequired(true)// Enable national secret encryption
.start(this.getApplicationContext());
Configure Proguard
Add the following content to the proguard configuration file to prevent the Tingyun App SDK from being unusable.
# ProGuard configurationsfor NetworkBench Lens
-keep class com.networkbench.** { *; }
-dontwarn com.networkbench.**
-keepattributes Exceptions, Signature, InnerClasses
# End NetworkBench Lens
If the project uses OkHttp 3, add the following content to proguard.cfg to avoid affecting network metric collection.
-keep class okhttp3.** { *;}
-dontwarn okhttp3.**
If the project enables national secret, add the following content to proguard.cfg to avoid affecting data collection.
-keep class org.bouncycastle.**{ *;}
-dontwarn org.bouncycastle.**
If line number information needs to be retained, add the following content to proguard.cfg.
-keepattributes SourceFile,LineNumberTable
Packaging and Compilation
gradle clean build
Embedding Verification
After embedding is complete, you can check the results of the Tingyun App SDK log output through "LogCat" for data collection server verification with the TAG NBSAgent. The standard log output result is as follows:
NBSAgent start
NBSAgent enabled
NBSAgent V “TingYun_Version” //TingYun_Version is the version number of the current SDK
connect success
Function Module Switch Verification:
After embedding is complete, you can check the results of the Tingyun App SDK log output through "LogCat" for function module verification, filter for 'TAG' as 'TingYun', the standard log output result is as follows:
networkModule is true
uiModule is true
crashModule is true
webviewModule is true
socketDataModule is true
crossAppModule is true
anrModule is true
userActionModule is true
cdnModule is false
recordModule is true
allTraceCollectModule is true
violenceModule is true
logModule is true
oomModule is true
batteryModule is true
batteryErrorEnabled is true
recordNetworkEnabled is true
cpuModuleEnabled is true
fpsModuleEnabled is true
appExitModule is true
Appendix (Optional Configuration)
Enable Visual Naming
Enable the visual naming feature to rename 'native pages' and 'operations' for display in the user experience module by selecting within the app.
-
Obtain Scheme。
In the app's 'Settings' under 'Modify Settings', select [URL Scheme].

-
Add scheme configuration to the 'LAUNCHER Activity' in the AndroidMainfest.xml file as shown below:
<activity android:name=".MainActivity">
   <intent-filter>
      <action android:name="android.intent.action.MAIN" />
      <category android:name="android.intent.category.LAUNCHER" />
   </intent-filter>
   <!-- Add the entire intent-filter block here and ensure there is only one data field -->
   <intent-filter>
      <data android:scheme="tingyun.xxxx" />
      <!-- Replace "tingyun.xxxx" in the scheme with the URL Scheme from the Tingyun report settings page -->
      <action android:name="android.intent.action.VIEW"/>
      <category android:name="android.intent.category.DEFAULT"/>
      <category android:name="android.intent.category.BROWSABLE"/>
   </intent-filter>
   <!-- Add the entire intent-filter block here and ensure there is only one data field -->
</activity>